> For the complete documentation index, see [llms.txt](https://elysia.gitbook.io/elysia-perps/llms.txt). Markdown versions of documentation pages are available by appending `.md` to page URLs; this page is available as [Markdown](https://elysia.gitbook.io/elysia-perps/getting-started/user-guide-mobile.md).
# Mobile Guide
The same five steps as the [Desktop Guide](/elysia-perps/getting-started/user-guide-desktop.md). What differs is the screen layout and how you connect your wallet.
## Before you start
| What | Detail |
| ------------ | ------------------------------------------------------------------------------------------ |
| EL tokens | On **Ethereum mainnet**, as ERC-20. Contract: `0x2781246fe707bb15cee3e5ea354e2154a2877b16` |
| ETH for gas | A small amount in the same wallet |
| A wallet app | MetaMask, Binance Wallet, SafePal, Trust Wallet, or any of 500+ supported wallets |
Getting EL into your wallet works the same as on desktop. See the [Desktop Guide](/elysia-perps/getting-started/user-guide-desktop.md) for the three things to get right when withdrawing from an exchange.
The minimum deposit is **1,000 EL**.
***
## How the mobile screen is laid out
Two things are different from desktop, and knowing them upfront saves a lot of hunting.
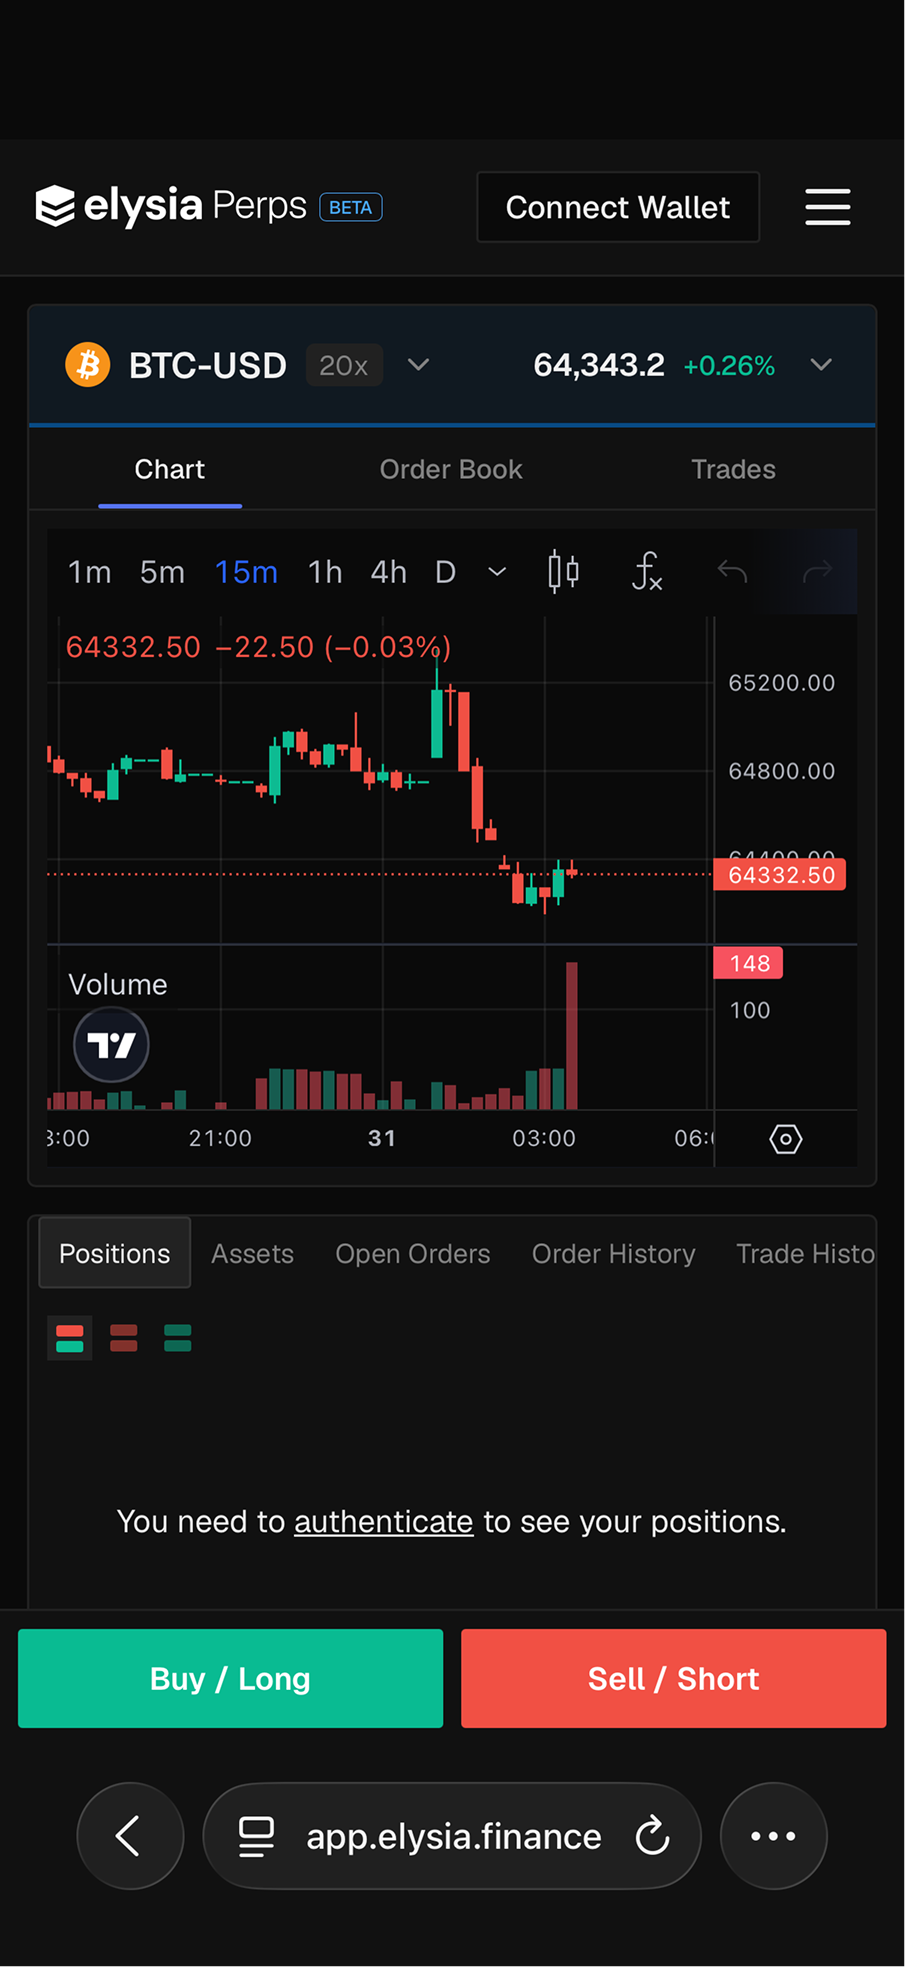
* **Chart, Order Book and Trades are tabs**, not side-by-side panels. Tap to switch.
* **Buy / Long and Sell / Short sit at the bottom of the screen at all times.** Tapping either one opens the order form as a sheet that slides up. There is no permanent order panel like on desktop.
***
## Step 1. Open the app and connect
There are two ways in. Both end at the same place.
### Path A. Your wallet's in-app browser
Most wallet apps have a built-in browser. Using it keeps everything in one app, with no switching back and forth.
1. Open your wallet app and find the browser tab
2. Enter `app.elysia.finance/trade`
3. Tap **Connect Wallet**, then sign the login message
### Path B. Your mobile browser (Safari, Chrome)
1. Open `app.elysia.finance/trade`
2. Tap **Connect Wallet** at the top
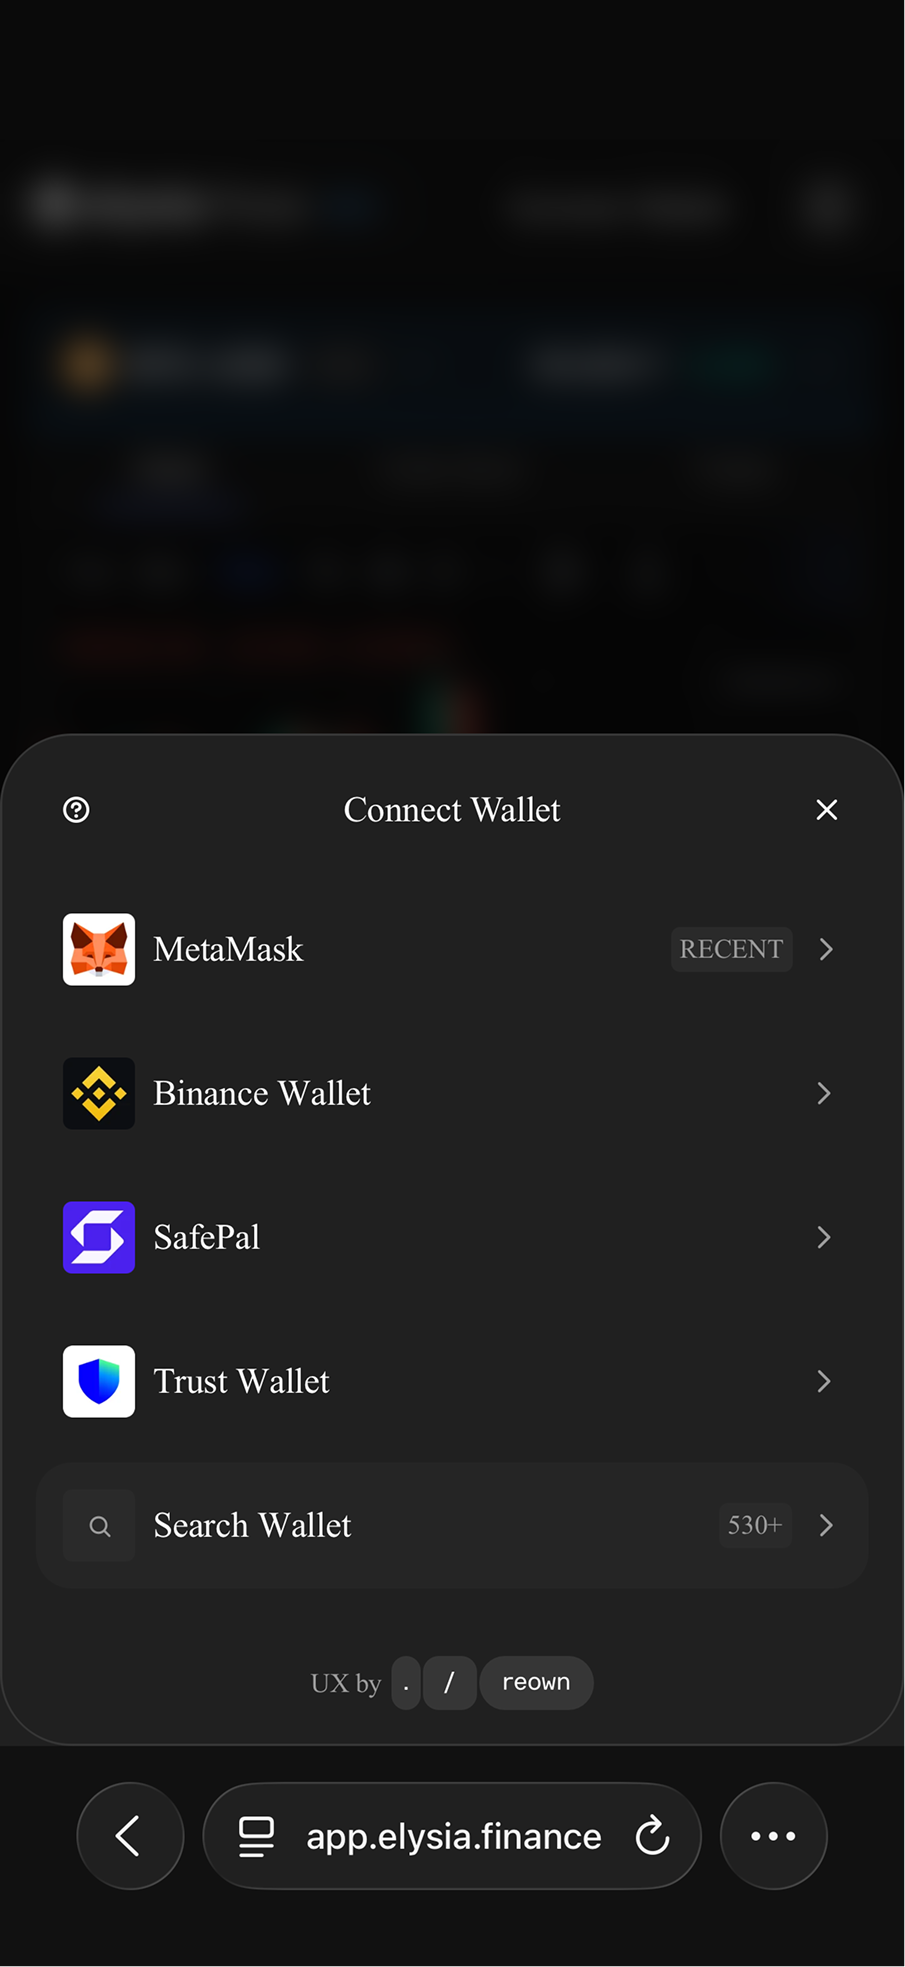
3. Pick your wallet from the list, or search. Your wallet app opens.
4. Approve the connection there, then return and sign the login message
{% hint style="info" %}
Signing is free and moves no funds. Until you sign, the Positions tab will say you need to authenticate.
{% endhint %}
***
## Step 2. Deposit EL
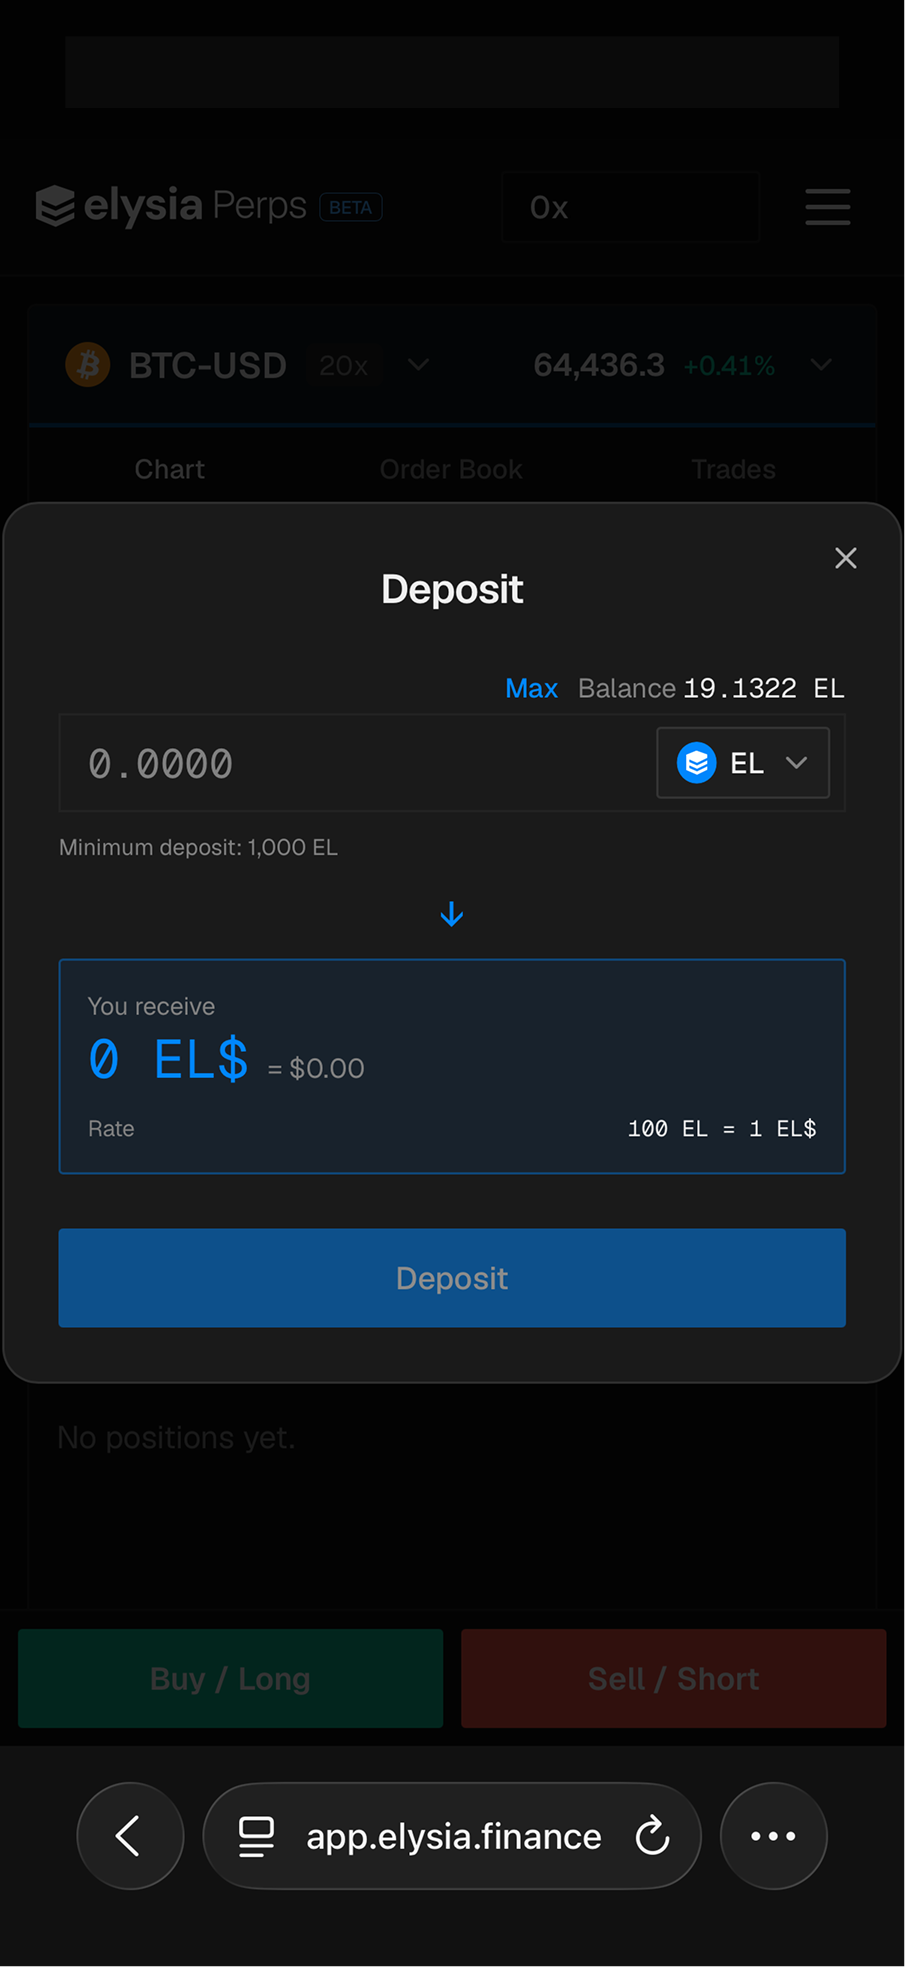
Deposited EL becomes **EL$**, the trading unit. The rate is shown in the modal: `100 EL = 1 EL$`.
**Deposit sits in two places.** Either works.
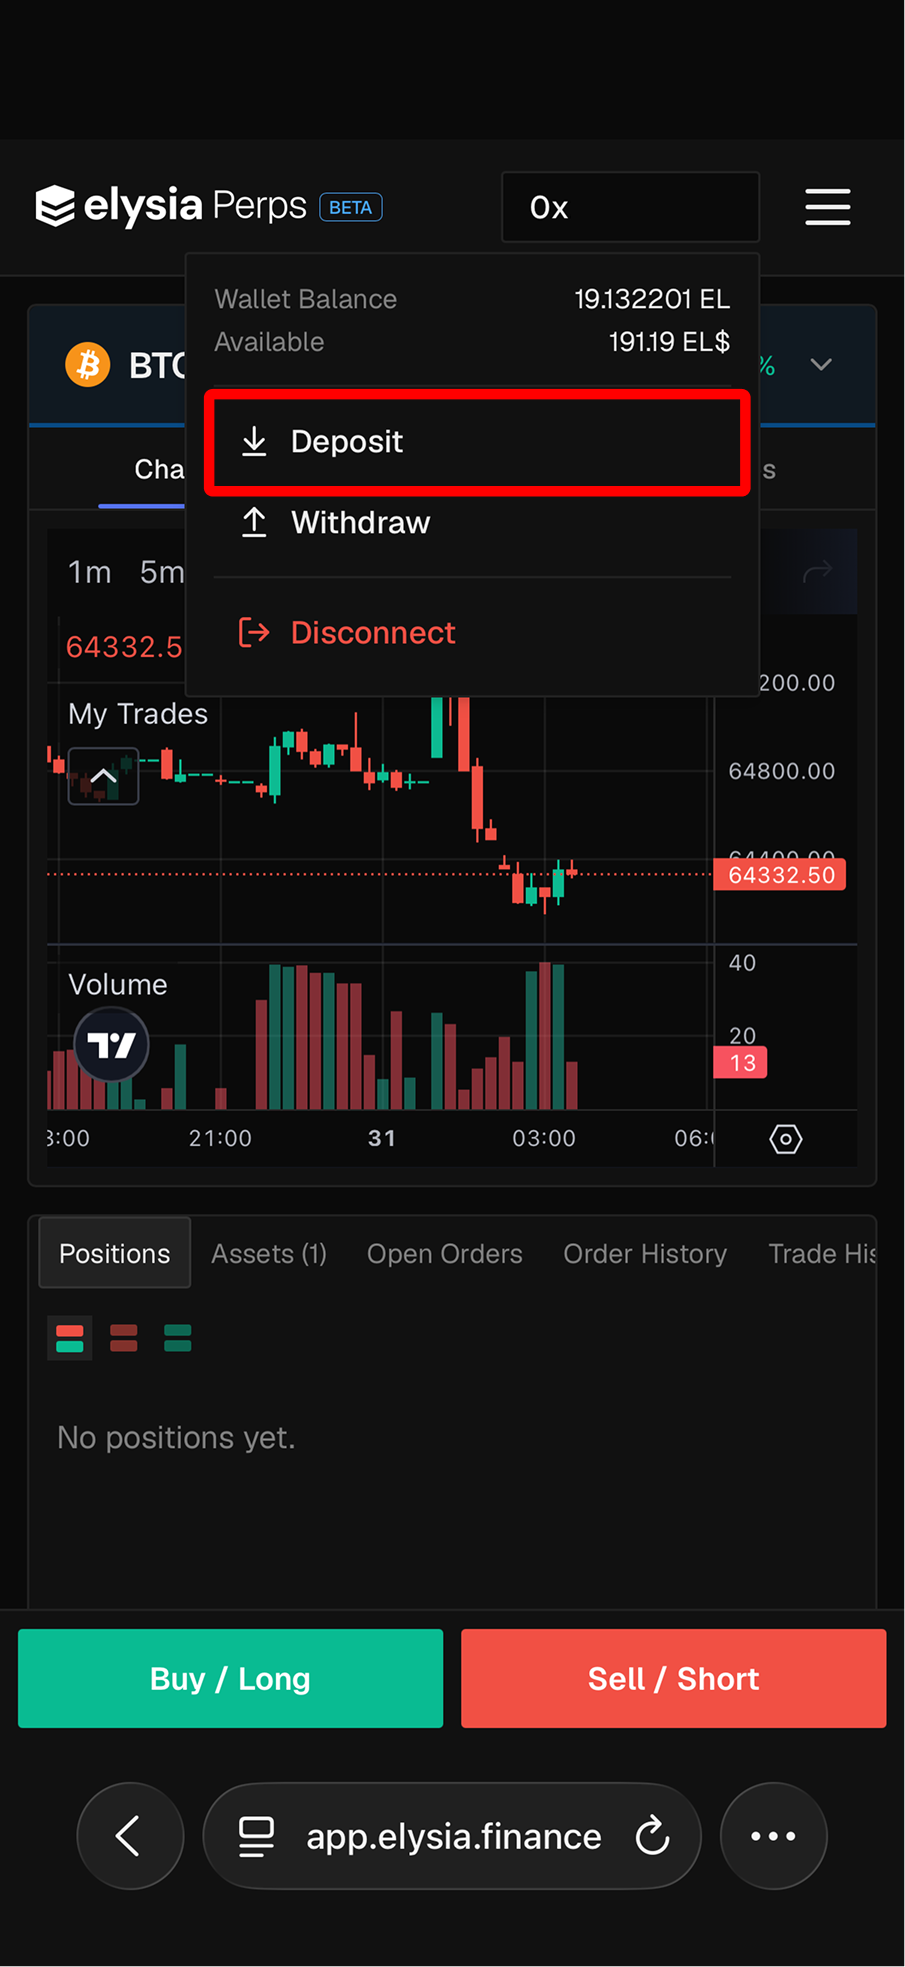
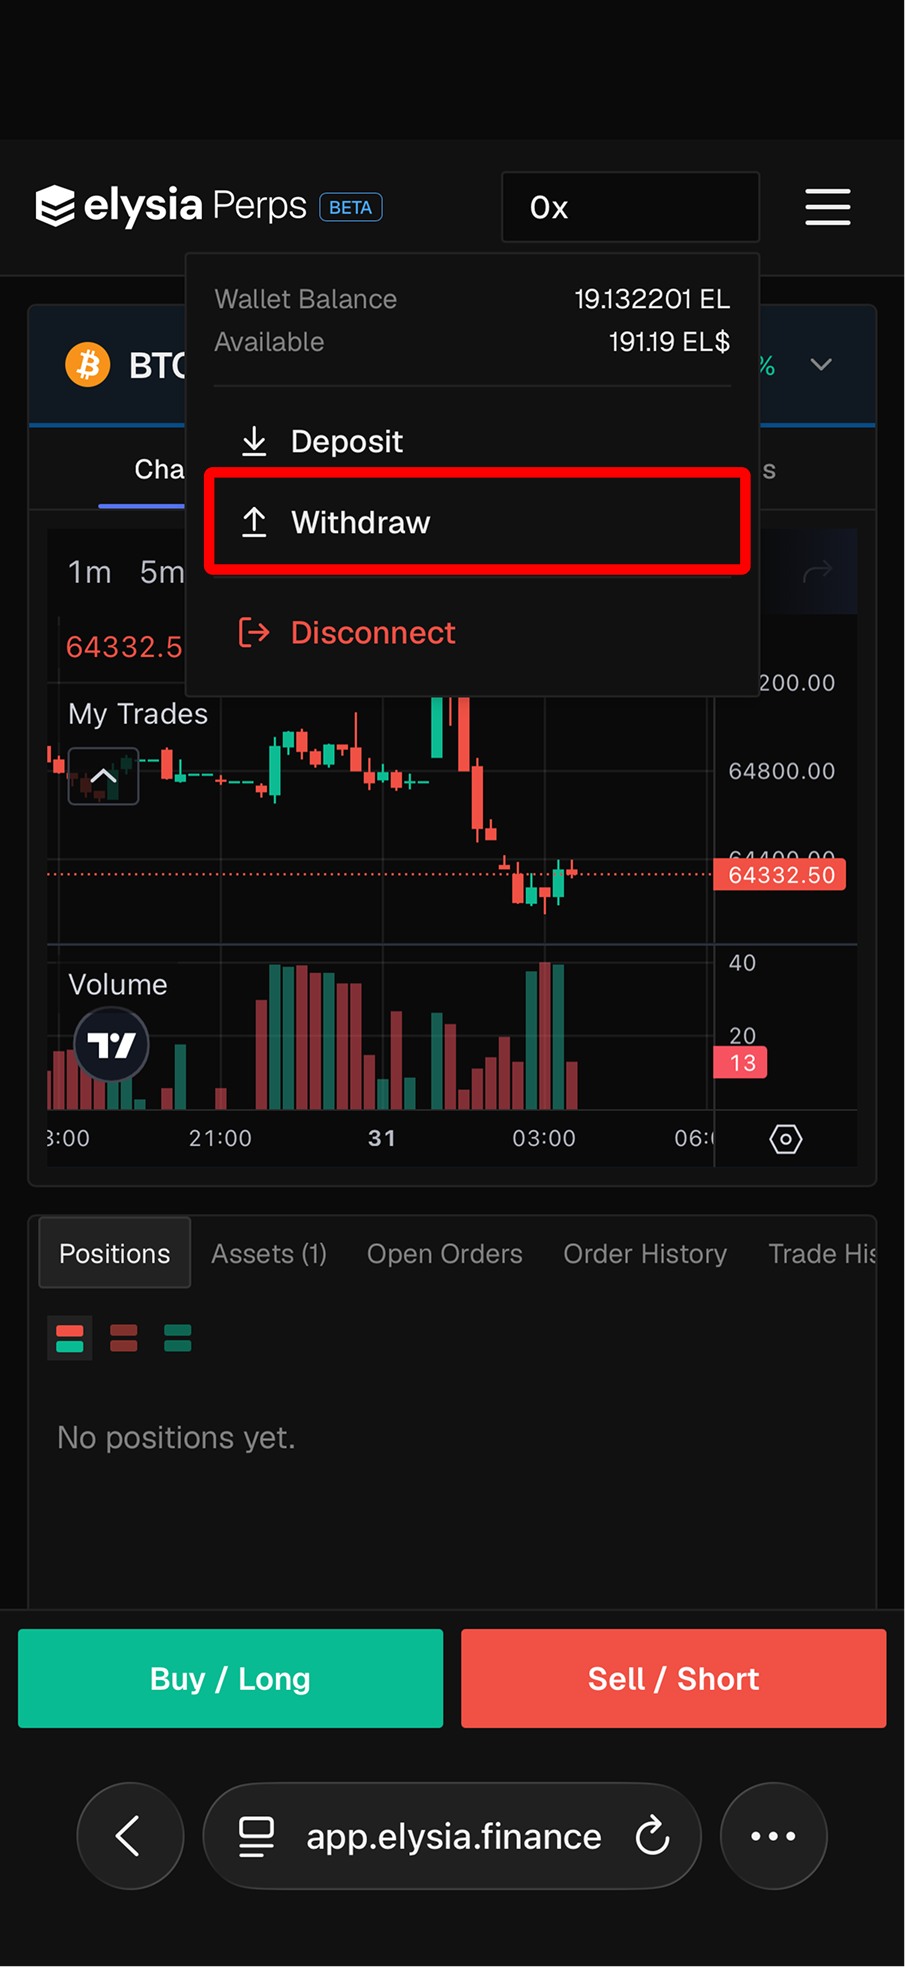
* Tap your wallet address at the top right. The menu shows your balance plus **Deposit** and **Withdraw**.
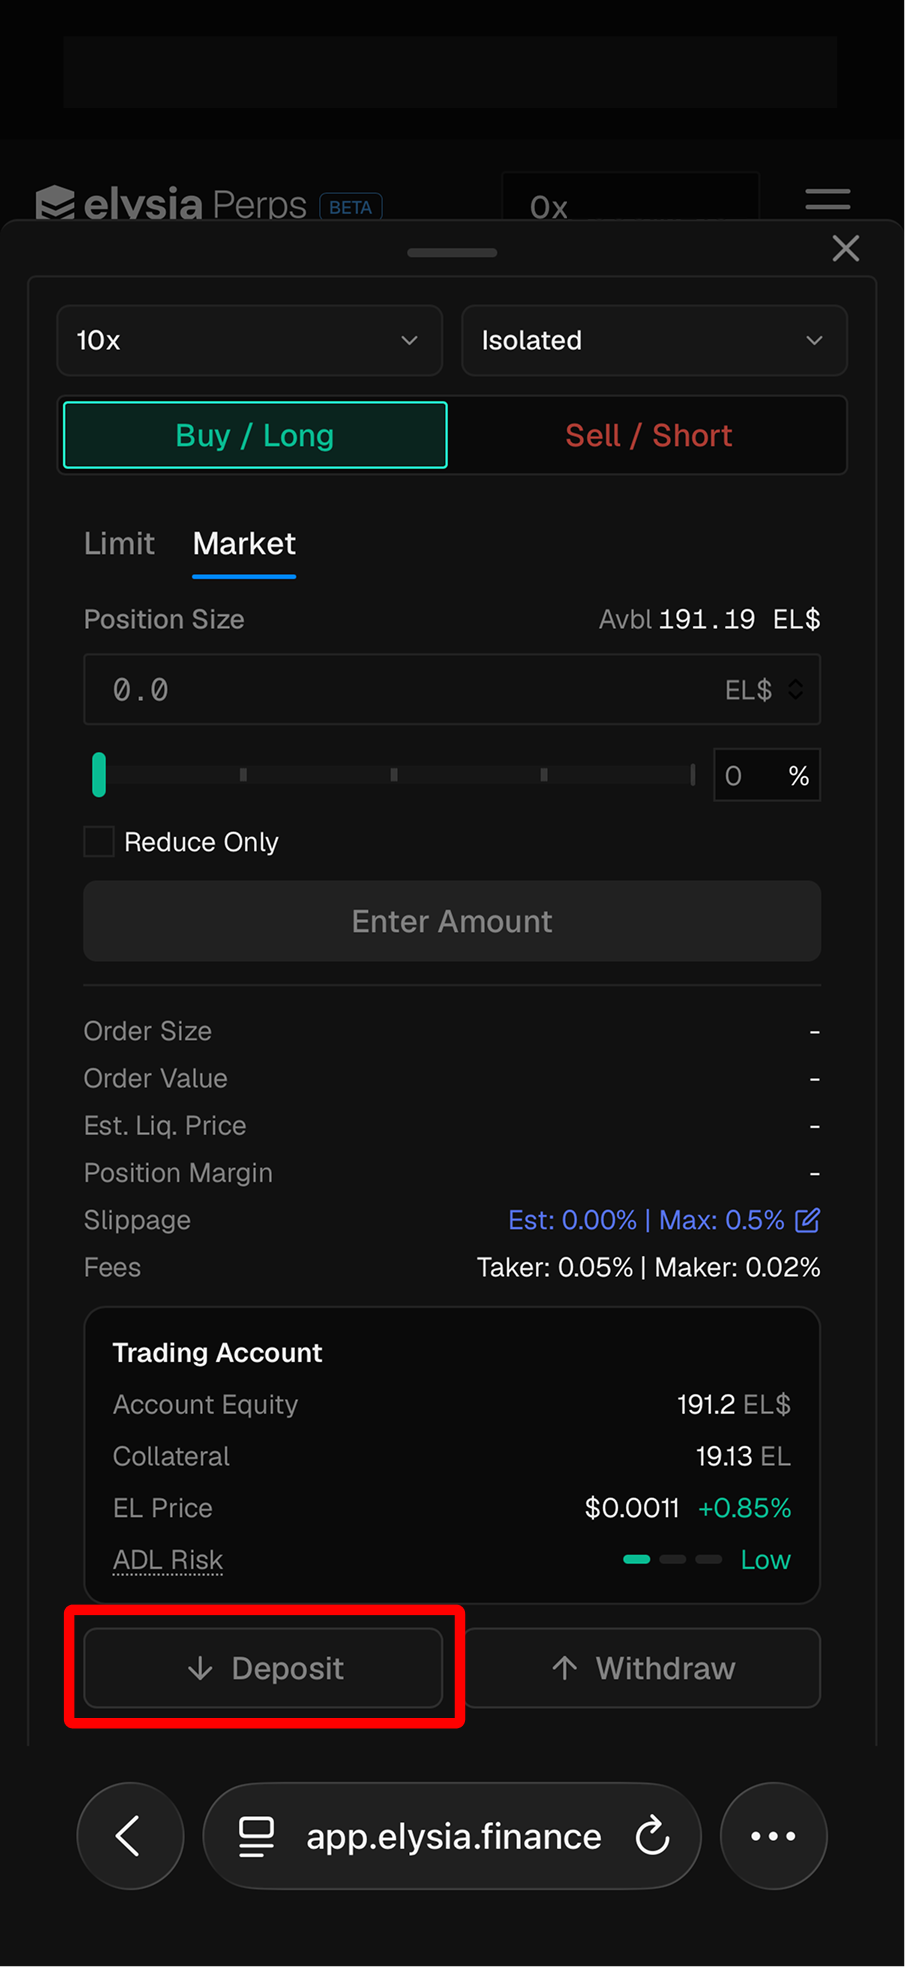
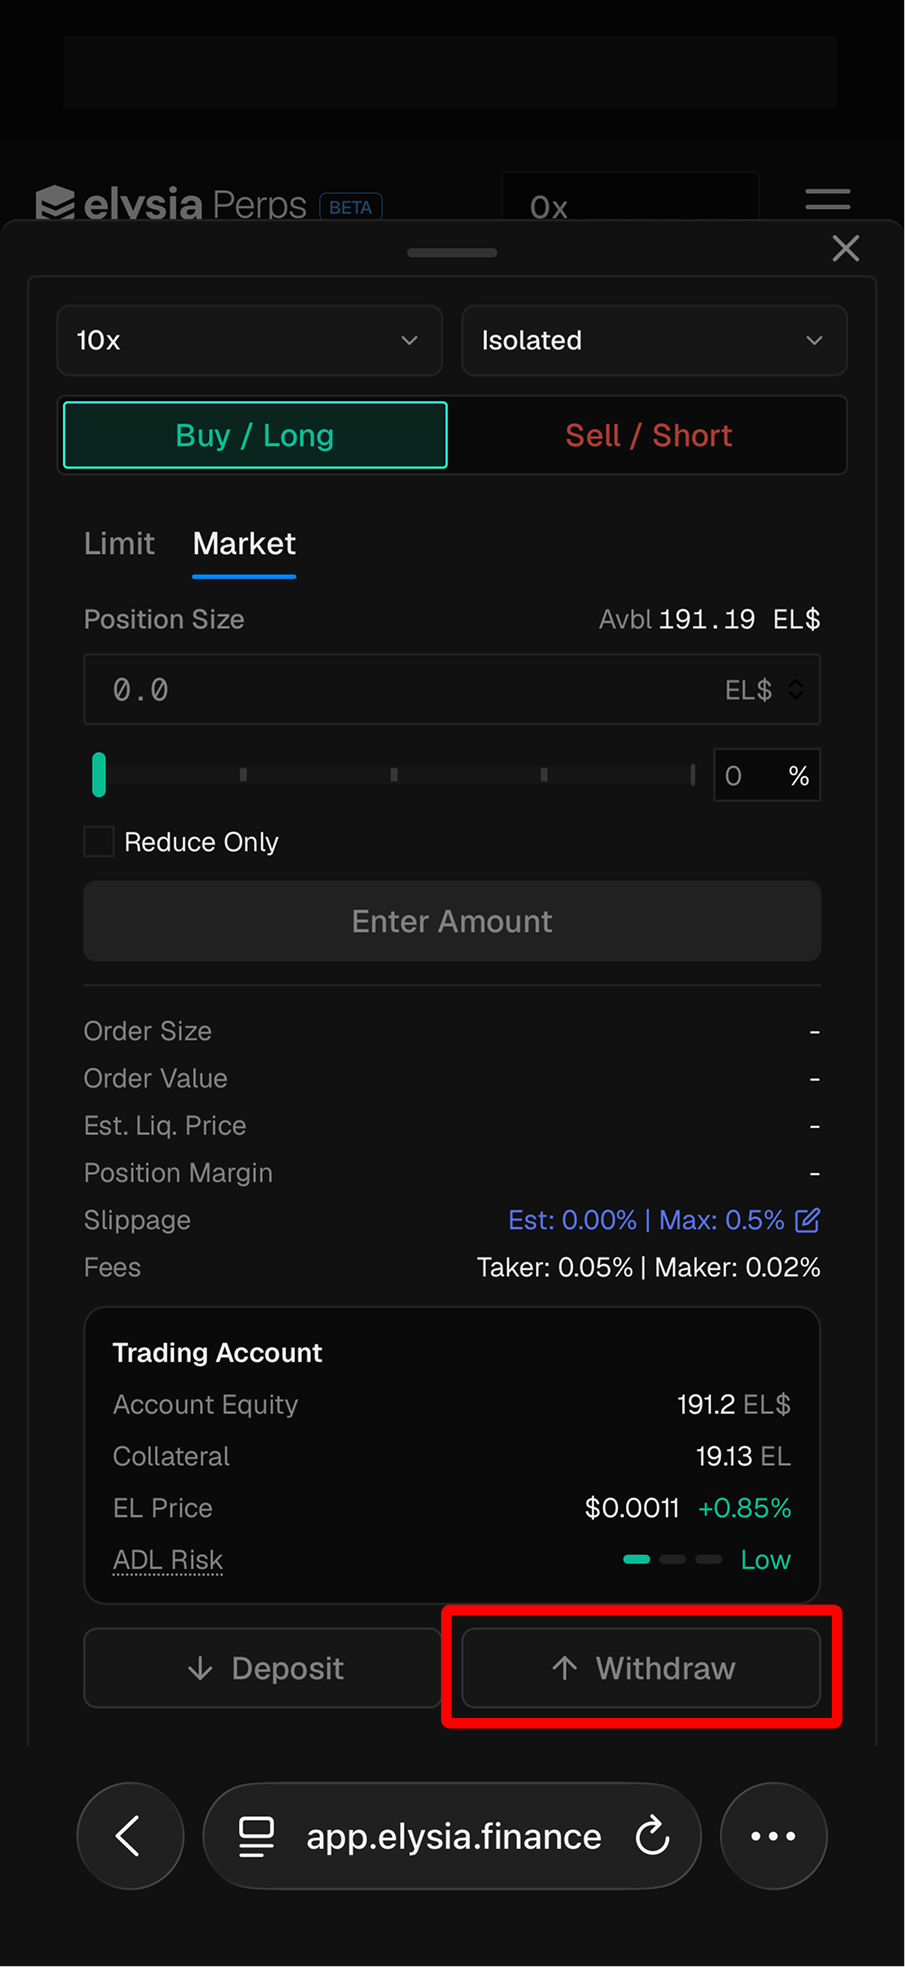
* Or open the order sheet (tap Buy / Long) and scroll to the bottom.
Then:
1. Tap **Deposit** to open the modal
2. Enter the amount, or tap **Max**. Minimum is **1,000 EL**.
3. Tap **Deposit** to submit, then **Approve** in your wallet, then confirm the deposit
{% hint style="info" %}
**Your wallet will prompt you twice**, once to Approve and once to Deposit. Approve on its own does not move anything, so keep enough ETH for both.
On Path B each prompt switches you to the wallet app and back. Wait for each transaction to confirm before starting the next.
{% endhint %}
`100 EL` becomes `1 EL$`. Your deposit will show as a much smaller number — nothing is lost. It is the same balance in the trading unit, and withdrawing converts it straight back at the same rate.
***
## Step 3. Open a position
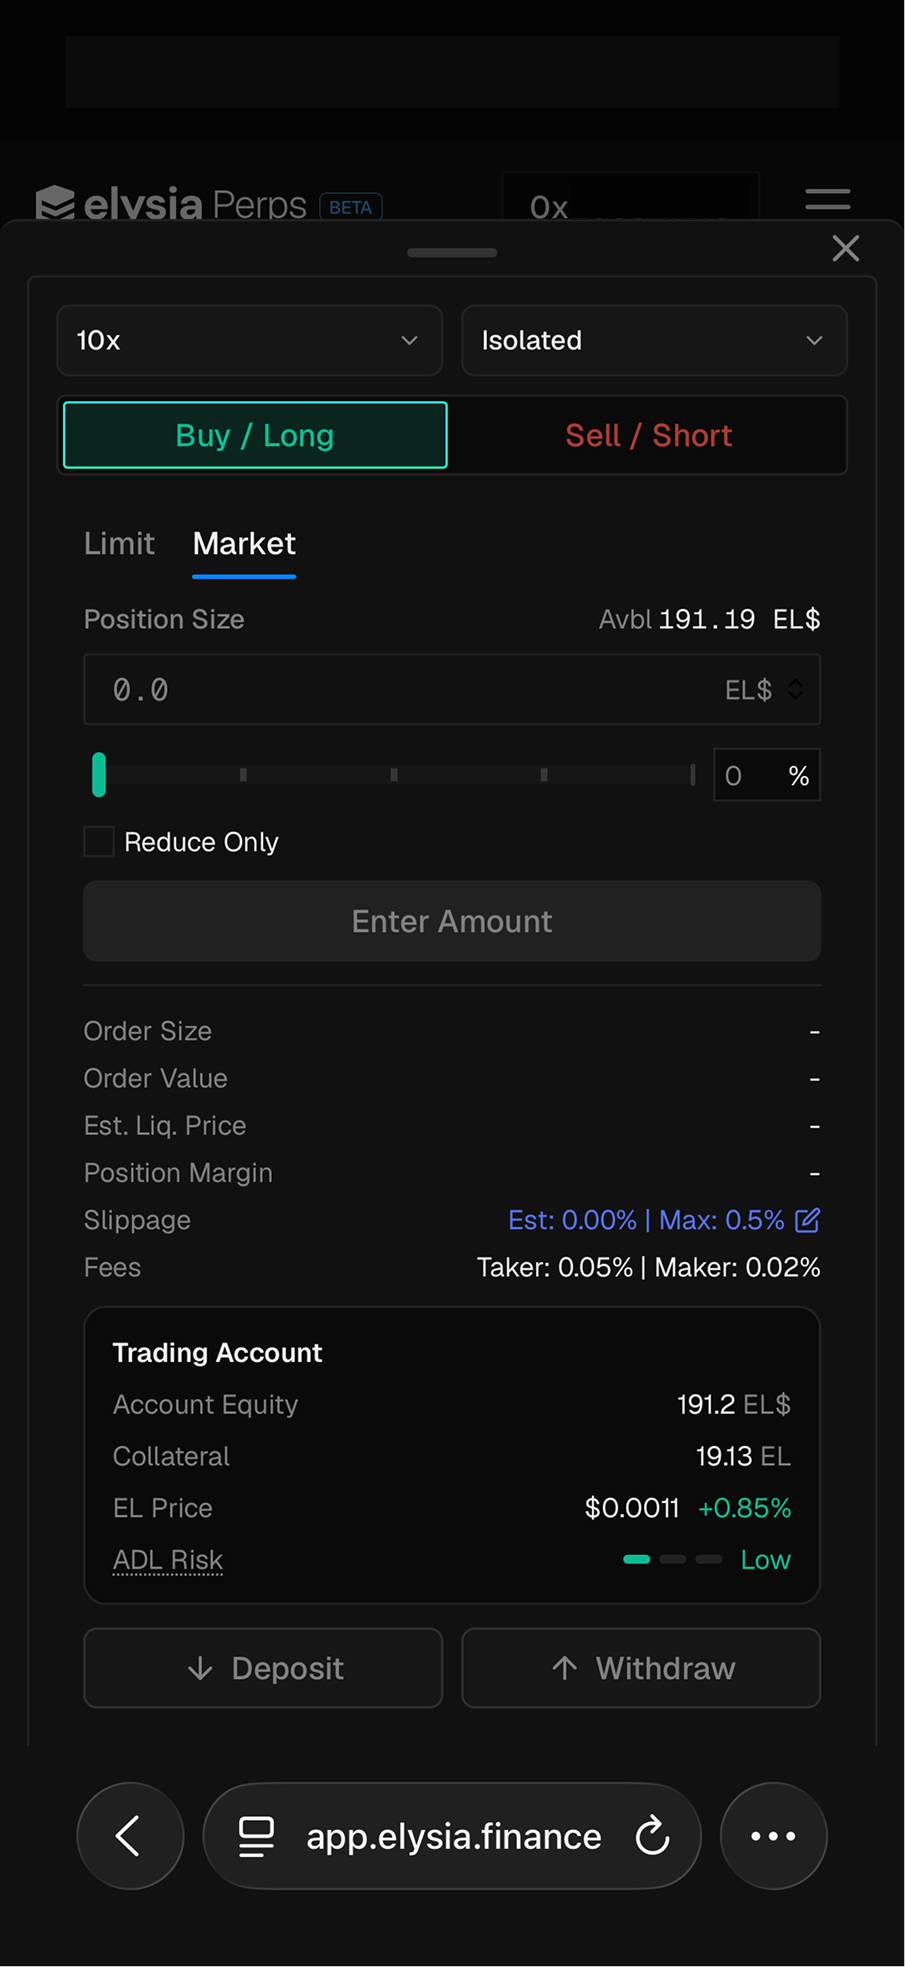
Tap **Buy / Long** or **Sell / Short** at the bottom. The order form slides up as a sheet. **Scroll inside the sheet** to reach everything.
At the top of the sheet:
1. **Leverage**. It starts at **2x**. If you are new to this, drop it to the lowest setting.
2. **Margin mode**. **Isolated** limits your risk to that one position.
3. **Buy / Long** or **Sell / Short**, if you want to switch sides
4. **Limit** or **Market**
Then:
1. Enter **Position Size**. The unit is **EL$** by default, and the arrows next to it switch units. The **%** slider is quicker.
2. Check **Est. Liq. Price** and **Fees**, then submit
### Market
Fills right away at the best available price. There is no Price field. Instead you get a **Slippage** row, set to a `0.5%` maximum by default, which you can edit. If the price moves past that limit before your order fills, the order does not go through.
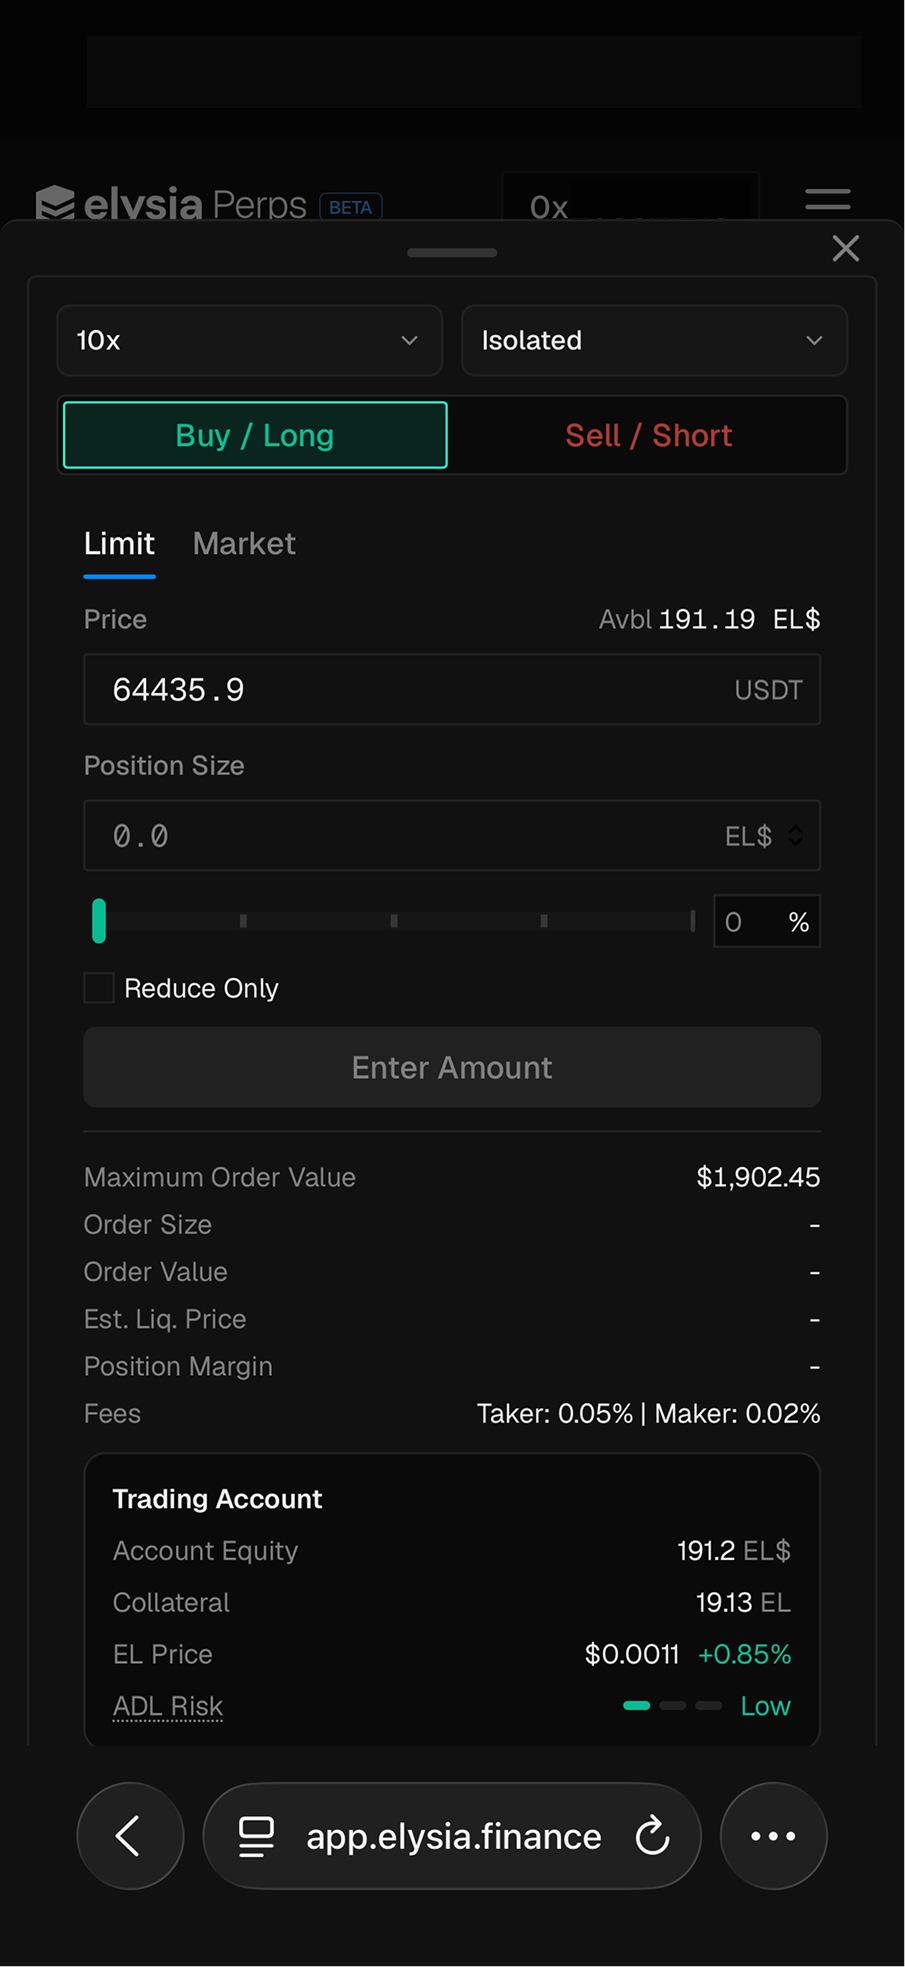
### Limit
The sheet opens on **Limit** by default. You set the price yourself, so the order can sit unfilled until the market reaches it. Market fills right away, which makes it the simpler choice for a first position.
If you submitted and nothing happened, your order is waiting at your price. Check the **Open Orders** tab, cancel it there, and try again with Market.
**Est. Liq. Price** is where the position gets force-closed. Higher leverage puts it closer to the current price. See [Liquidation](/elysia-perps/mechanics/liquidation.md) for how that works.
**Fees**: Taker 0.05% / Maker 0.02%
***
## Step 4. Close a position
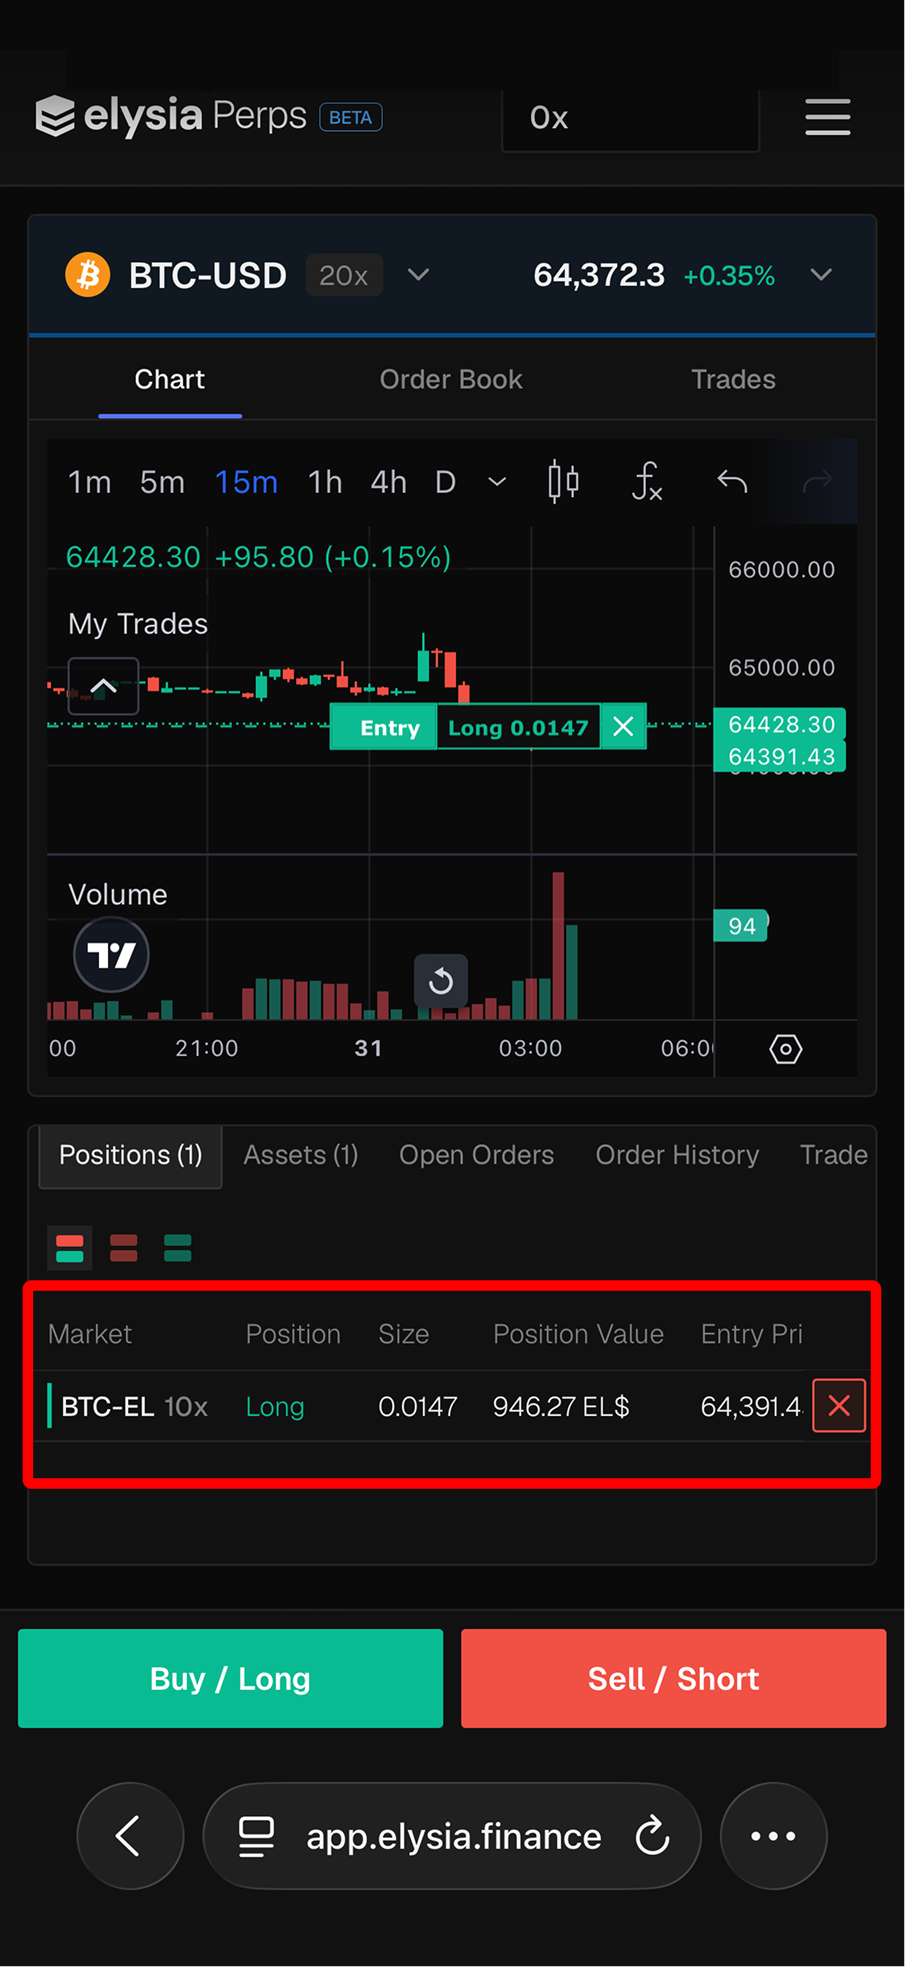
1. Scroll down to the tab row and open **Positions**. The tab shows a count, like `Positions (1)`. The tabs scroll sideways.
2. Your position appears as a row: Market, Position, Size, Position Value, Entry Price, and more.
3. Tap the **red X** at the right end of the row to close it, then confirm.
{% hint style="info" %}
The row is wider than the screen. **Swipe the table sideways** to see Mark Price, Liq. Price, Unrealized PnL, Margin and Funding.
You can also close from the chart. Your entry is marked with a green **Entry** label, and the X next to it closes the position.
{% endhint %}
PnL settles in EL$ and returns to your Collateral.
***
## Step 5. Request a withdrawal
**Withdraw sits in the same two places as Deposit.** Either works.
* Tap your wallet address at the top right. The menu shows your balance plus **Deposit** and **Withdraw**.
* Or open the order sheet (tap Buy / Long) and scroll to the bottom.
Then:
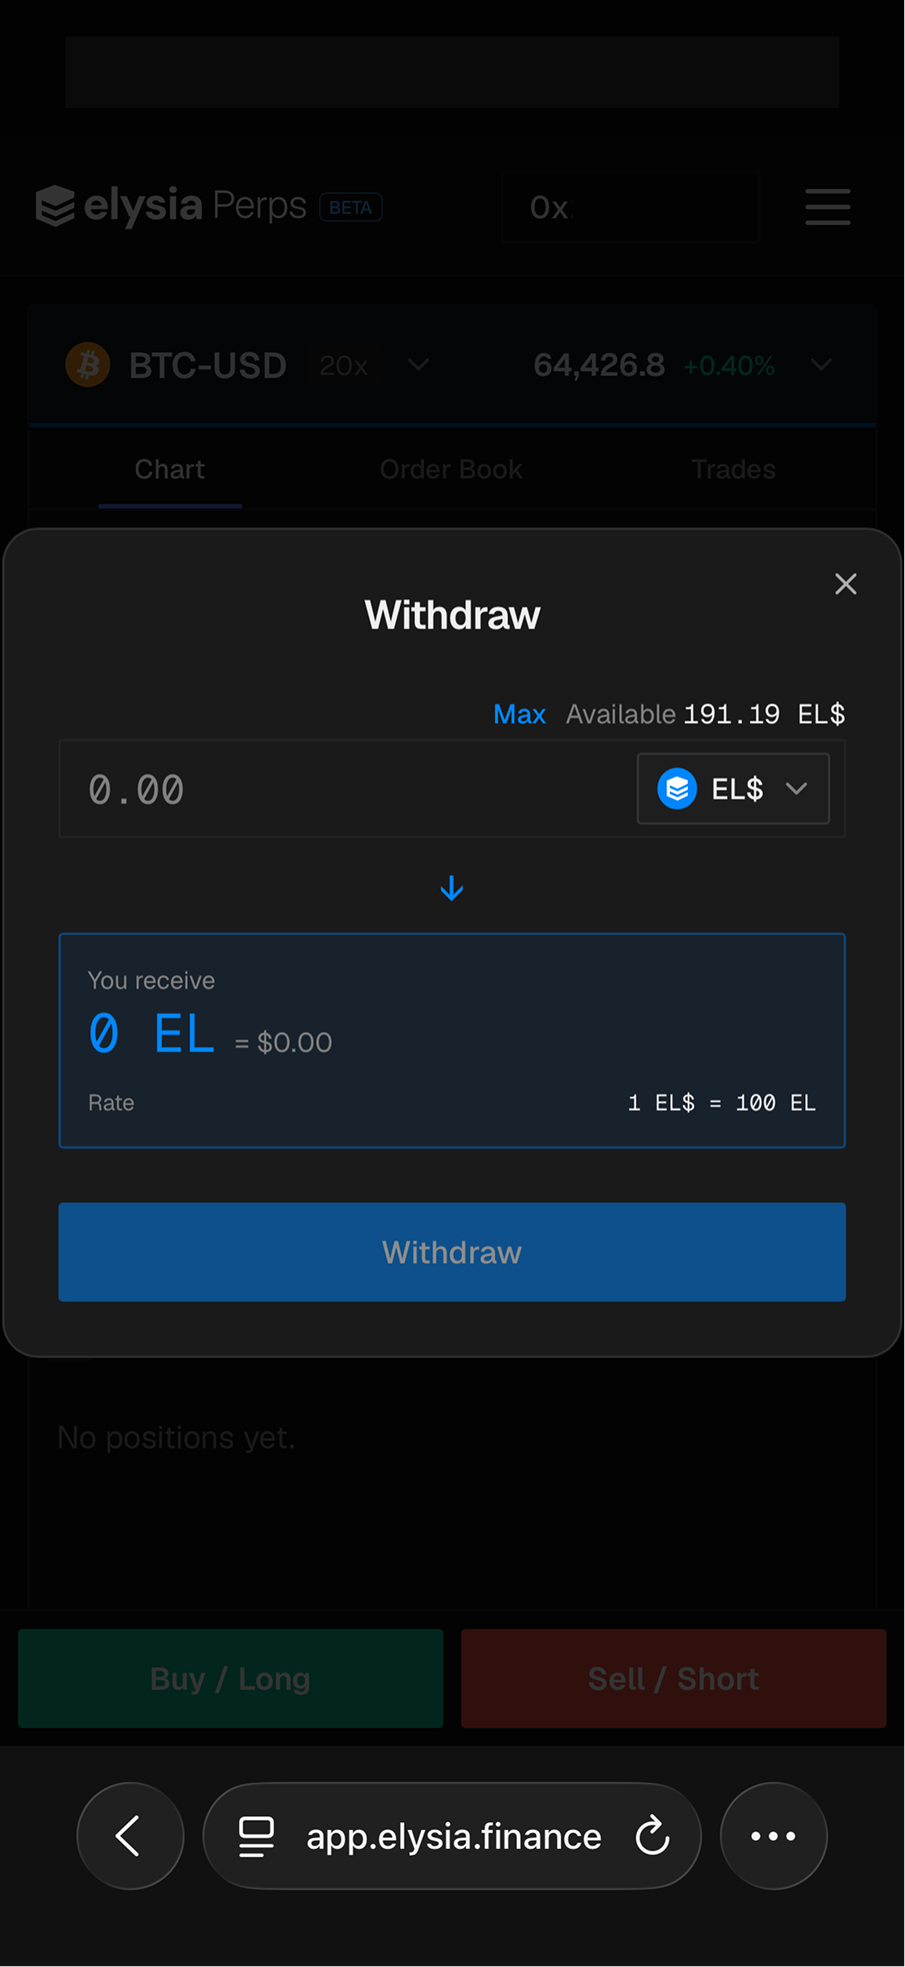
1. Tap **Withdraw** to open the modal
2. Enter the amount in EL$, or tap **Max**
3. Check the **You receive** box. Rate: `1 EL$ = 100 EL`
4. Tap **Withdraw** to submit
5. Track it under the **Withdrawals** tab
{% hint style="info" %}
Withdrawals go through a team approval step before they are sent on-chain, so it is not instant. Requests are processed **within 48 hours**.
{% endhint %}
***
## Troubleshooting on mobile
| Problem | What to check |
| --------------------------------------------------- | ---------------------------------------------------------------------------------------------------- |
| "You need to authenticate to see your positions" | You are connected but have not signed the login message. Sign it, and the tabs will fill in. |
| Connect Wallet does nothing | Your wallet app may not be installed. Try Path A, opening the site inside your wallet app's browser. |
| Wallet opened but nothing came back | Switch back to the browser manually. The request is usually still waiting there. |
| Connection dropped mid-way | Sessions can time out when you leave the app for a while. Reconnect and try again. |
| Transaction confirmed but the screen did not update | Pull to refresh, or reload the page. The balance is on-chain either way. |
| Approve went through but nothing deposited | Approve and Deposit are two separate transactions. Run the second one. |
| Cannot find the order form | It is not on the screen by default. Tap **Buy / Long** or **Sell / Short** at the bottom. |
| Cannot find leverage or margin mode | They are at the very top of the order sheet. Scroll up inside the sheet. |
| Not enough gas | ETH for gas has to be in the same wallet, on Ethereum mainnet. |
***
## Support
We will never DM you first, and we will never ask for your seed phrase, private key, or any payment.
---
# Agent Instructions
This documentation is published with GitBook. GitBook is the documentation platform designed so that both humans and AI agents can read, navigate, and reason over technical content effectively. Learn more at gitbook.com.
## Querying This Documentation
If you need additional information that is not directly available in this page, you can query the documentation dynamically by asking a question.
Perform an HTTP GET request on the current page URL with the `ask` query parameter, and the optional `goal` query parameter:
```
GET https://elysia.gitbook.io/elysia-perps/getting-started/user-guide-mobile.md?ask=&goal=
```
`ask` is the immediate question: it should be specific, self-contained, and written in natural language.
`goal` is optional and describes the broader end goal you are ultimately trying to accomplish on behalf of the user. GitBook uses it to tailor the answer towards what is most useful for that goal.
The response will contain a direct answer to the question and relevant excerpts and sources from the documentation.
Use this mechanism when the answer is not explicitly present in the current page, you need clarification or additional context, or you want to retrieve related documentation sections.